Viewing Images with Emacs and the image-dired package

Peter Prevos |
1890 words | 9 minutes
Share this content
Emacs is a powerful text editor that lets you manage your life and be creative and productive with text. This focus on text does mean that Emacs cannot help you managing and editing images. This article shows how to view and manage images with Emacs using the image-mode and the built-in image-dired package by Mathias Dahl and Stefan Kangas.

Emacs Writing Studio
A comprehensive guide for writers seeking to streamline their workflow using Emacs. The book covers everything from organising ideas and writing distraction-free to publishing in multiple formats. It’s perfect for both beginners and experienced Emacs users, offering practical tips and a tailored configuration to enhance your writing process.
The source files of the book and EWS configuration are also freely available on GitHub.
Prerequisites
Image-mode and the image-dired package are bundled with Emacs, so there is no need to install packages, but you might need some additional software.
You can view images without external software, but you cannot manipulate them. The ImageMagick software suite provides functionality for editing and manipulating images.
Emacs Writing Studio checks whether the required software is available when it starts. Check the *Messages* buffer to see of there are any warnings.
Viewing images
Emacs can display various popular image formats out-of-the-box with image mode. You can open an image file directly with find-file or through the directory editor (dired). You can also open an image from within an Org file with C-c C-o (org-open-at-point) with the cursor on the image. Emacs automatically scales the image to snugly fit inside the display window.
A range of keyboard shortcuts are available to view images. The n and p keys (next and previous) or the left and right arrows flick though the images in the current directory.
Image mode also provides several commands to change the display size of images (I am unsure why the prefix key is s for some commands, but i for others, but alas):
s o: Show image at original size (when it doesn't fit in the window, scroll through the image with the arrow keys).s w: Fit the current image to the height and width of the window.i +: Increase the image size by 20%i -: Decrease the image size by 20%.
Furthermore, image mode can manipulate images:
i r: Rotate the image by 90 degrees clockwise.i h: Flip the image horizontally.i v: Flip the image vertically.i c: Crop the image.i x: Cut a rectangle from the image and replace with black.
The crop and cut commands display a rectangular frame superimposed on the image. Use the mouse to move and resize the frame. Type m to move the frame instead of resizing it and type s to convert the frame to a square. When you are satisfied with the result, type enter to crop or cut the image. You can exit the crop and cutting menu with q without changing the source file. Please note that these commands are only available when ImageMagick is installed.
If you like to retain the result of the transformation, press i o to save the image under a new name.
When you are done with watching images, use q to quit the image buffer, or k to kill the image buffer altogether.
The image-dired package
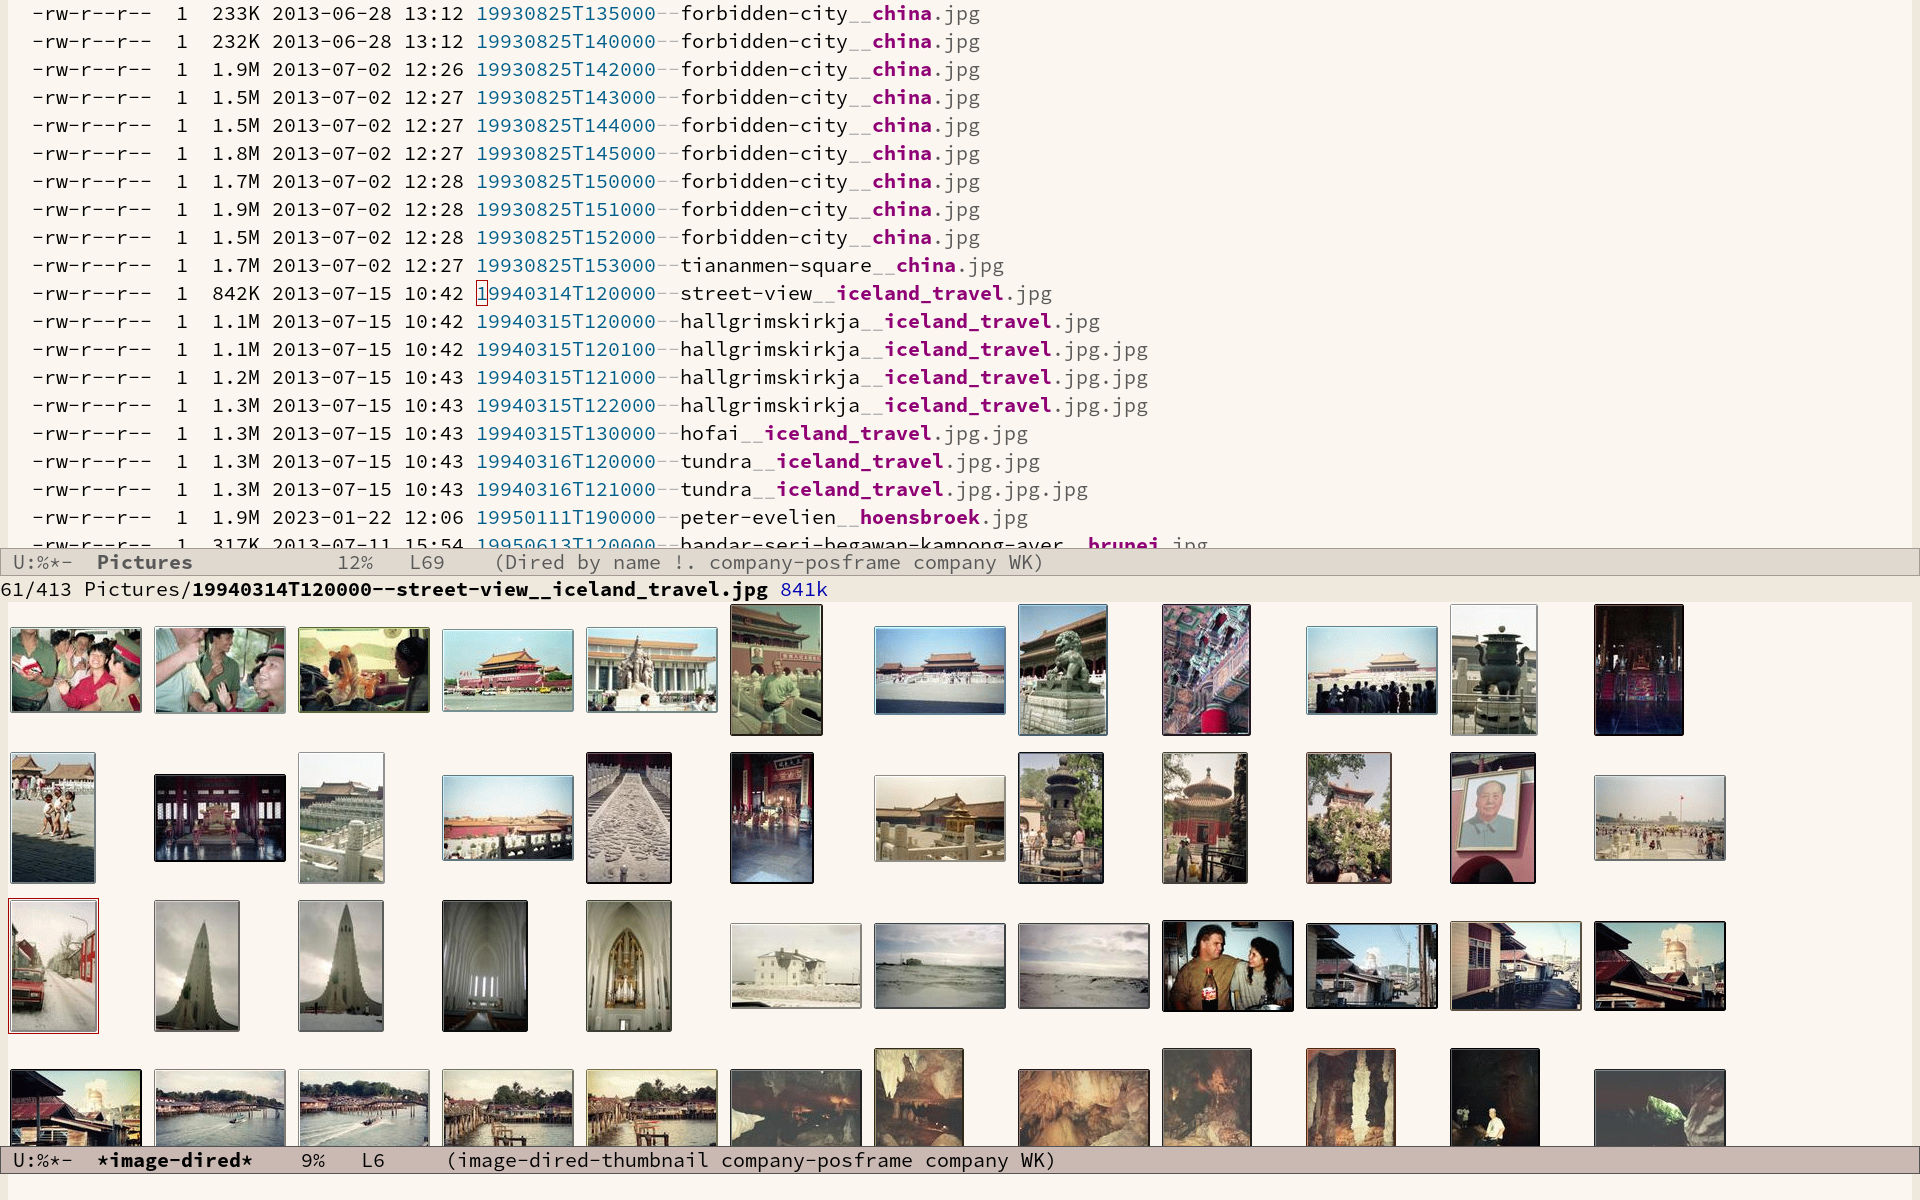
Viewing images individually is great, but wouldn't it be nice if you cold see thumbnails before delving into your collection? The image-dired package provides a thumbnail buffer to view and maintain images from within a dired buffer using thumbnails.
Evaluate the image-dired function (bound to C-c w I in Emacs Writing Studio) and select the directory you like to use. Emacs splits the screen and presents a thumbnail screen (of up to a thousand entries) to explore your collection. Emacs stores the thumbnails in the configuration directory for future reference.

Alternatively, when you are inside a Dired buffer that contains images, mark the images you like to view and generate the thumbnails with C-t d (image-dired-display-thumbs). If you don't mark any files, the program uses the image under the cursor.
Yet another method of previewing your images is by marking the ones you need and generate inline thumbnails inside the Dired buffer with C-t C-t (image-dired-dired-toggle-marked-thumbs). The same shortcut also removes the thumbnails.
The active image is marked with a flashing border around the thumbnail and its filename is displayed on the top of the thumbnail window.
You can navigate the thumbnails with the arrow keys. The < and > keys take you to the start or end of the collection. You can remove a thumbnail from the collection with C-d. If you have selected more images than thumbnails that can fit on page, then image-dired tracks your movement, so as your cursor moves up or down, the thumbnails refresh.
To view an image, hit enter when the thumbnail is marked. You cycle through the marked images in your collection with the space and backspace buttons, or C-<left> / C-<right>.
But why manually flick through your album if you can let Emacs do this for you? The S key starts a slideshow with each image shown five seconds by default. You can configure the delay with the image-dired-slideshow-delay variable, or drive the slideshow manually with the space and backspace keys, or C-<left> / C-<right>.
The main image display is in image mode, so all the actions described in the previous section apply.
As usual, q quits the image or thumbnail window.
Tagging images
The image-dired software can also create a plain text database of images with searchable tags and thumbnail descriptions.
You tag images directly from a dired buffer. The C-t t keystrokes lets you tag the selected files. You can retrieve the tags in a future session using C-t f and view the image thumbnails with C-t d, as described above. You can tag images from within a thumbnail buffer with the t t shortcut. You can also add a comment to the image by pressing c in the thumbnail viewer.
The file name, tags and comments show in the mini buffer as you move through the image thumbnails: directory: filename (tags): comment.
Emacs stores the metadata in the image-dired directory in your configuration folder in the .image-dired_db file. This is a plain text file that lists each file name and the tags an comment.
Retrieving tagged files only selects images with tags in the directory of the current dired buffer. It does not work across multiple folders.
This tagging system is nice, but it creates an integrity vulnerability in that it separates tags and files. When you accidentally remove the database, all metadata is lost. You will also loose access to the metadata when you rename an image.
An alternative method to tag files is to use the Denote file naming convention, which encodes metadata into the name of the file.
Using Denote to manage images
Denote is a package to produce and maintain plain text notes, but it can also be used to maintain a collection of binary (non-text) files. When using the Denote file naming convention for your images, you can mark parts of you collection using regular expressions. The Denote file naming convention encodes four bits of metadata about a file into the filename. Only the timestamp is compulsory and serves as a unique identifier:
- Timestamp in ISO 8601 format
- An alphanumeric signature (starting with double equality sign (
==) - The title in kebab-case (starting with double dash
==) - Keywords in snake_case (starting with double underscore
__)
For example, one photo in my collection is: 19930825T132000--forbidden-city-throne-palace-of-heavenly-purity__china.jpg. So this photo was taken on 25 August 1993, the title describes the topic of the photograph and
I can now go into Dired and mark files with regular expressions, searching for each of these fields. For example, using %m _china marks photos taken in China, or %m -city all images with the word "city" in their title. Using the Dired convention for naming files is not only great for notes, it also helps you manage your photo collection.
The denote-rename-file function (C-c w R) lets you construct a Denote-compliant file name for existing images or other binary files. This function uses the last modified date as the identifier by default. But when you are sorting old collections you might want to add a date that is different to the last modified one. Adding the universal argument (C-u) will also ask you to provide a date and time, i.e. (C-u C-c w R).
Editing Images
Emacs is a powerful piece of software but it is mostly limited to editing text. To meaningfully work with images, you will need another package. Image-dired lets you open images in external viewers or editors by setting one variable.
Pressing C-enter opens the file in an external viewer or editor. You can tell Emacs which external viewer to user by configuring the image-dired-external-viewer variable. I linked it to the GIMP (GNU Image Manipulation Program). The content of this variable obviously depends on your system and preferred viewer.
When you are in an image-dired buffer, you open the external viewer with C-enter. Confusingly, when you are in a normal dired buffer, this function is bound to C-t x. Emacs Writing Studio remaps the keys so that you can use C-enter in dired and in image-dired to open an image in your favourite external editor.
Configuration
Emacs image-mode and image-dired work out-of-the-box, but some configuration helps to add some convenience.
This configuration adds keyboard shortcuts to kill an image buffer, so your Emacs session is not littered with open pictures. It also lets you view your image gallery with the arrow keys instead of the non-intuitive space and backspace combination.
If you like reading more details about image-mode and its configuration options, type C-h r to open the Emacs manual, followed by g image-mode return.
  ;; Image viewer
  (use-package emacs
    :bind
    ((:map image-mode-map
                ("k" . image-kill-buffer)
                ("<right>" . image-next-file)
                ("<left>"  . image-previous-file))
     (:map dired-mode-map
      ("C-<return>" . image-dired-dired-display-external))))
The configuration for the image-dired package defines the external viewer and defines some convenience keybindings to flick through your albums.
To find out about further customisation options, type C-h r to open the Emacs manual, followed by g Image-Dired return.
  (use-package image-dired
    :custom
    (image-dired-external-viewer "gimp")
    (image-dired-thumb-margin 10)
    :bind
    (("C-c w I" . image-dired))
     (:map image-dired-thumbnail-mode-map
      ("C-<right>" . image-dired-display-next)
      ("C-<left>" . image-dired-display-previous)))
Emacs Writing Studio
If you like to support my work, then please purchase the Emacs Writing Studio book.

Emacs Writing Studio
A comprehensive guide for writers seeking to streamline their workflow using Emacs. The book covers everything from organising ideas and writing distraction-free to publishing in multiple formats. It’s perfect for both beginners and experienced Emacs users, offering practical tips and a tailored configuration to enhance your writing process.
You can find the source files for the book and the latest configuration files on GitHub:
Emacs is a malleable system, so everybody will have their personal preferences to undertake a task. Any article on how to be productive with Emacs is thus opinionated. If you have a different way of doing things, please share your views and leave a comment below, or complete the contact form to send me an email.
This is the last article in the Emacs Writing Studio series.
Share this content


